Tuesday, October 29, 2013

Templating with KnockoutJS

Another nice feature of KnockoutJS is the ability to have templates to display your data. For instance, say that if you have a collection of data and you want them to be displayed in a particular format without having to do much DOM manipulation. This can be achieved in two ways when it comes to KnockoutJS;


  • Using jQuery based templating
  • Using native knockout templating
In this tutorial i will show you both the ways and you will see why you would always want to use the native KnockoutJS templating given its unobtrusive nature.

So first off let us look at the example below;


<!DOCTYPE HTML PUBLIC "-//W3C//DTD HTML 4.01//EN" "http://www.w3.org/TR/html4/strict.dtd">
<html>
<head>
 <title>Superhero Registration</title>
</head>

<body>

 <div data-bind="template:'superHeroTemplate'">
  
  
 </div>


<script src="http://code.jquery.com/jquery-1.10.1.min.js"></script>
<script src="jquery-tmpl.js"></script>
<script type="text/javascript" src="http://cdnjs.cloudflare.com/ajax/libs/knockout/2.3.0/knockout-min.js"></script>

 <script type="text/javascript">
 
 $(function(){
   
   var data = [
    new superHero('Superman'),
    new superHero('Spiderman')
   ];
   
   var viewModel = {
    superHeroes:ko.observableArray(data)
   };
   
   function superHero(name){
    return {
     name:ko.observable(name)
    };
   }
   
   ko.applyBindings(viewModel);
  }
  );
 </script>
<script id="superHeroTemplate" type="text/html">
 <ul>
  {{each superHeroes}} 
   <li>${name}</li>
  {{/each}}
  
 </ul>
</script>
</body>
</html>

Ok i am obsessed with superheroes hence the use of examples follow the same pattern. Here what i am doing is constructing an observable array of super heroes.


function superHero(name){
    return {
     name:ko.observable(name)
    };
   }

The above function wraps the passed in input parameter to an observable object and passes it back. This is not required, but i have done as such so that Knockout will manage not only the observable array, but also the elements within the array since these are now observable objects themselves.

Here i am using jQuery templating and as such you need one additional script file to be included which you can dowload from here. Then you need to include it on your path in order for this example to work. I have saved this script file as jquery-tmpl.js. Note that the order you include these scripts are important as well. First it should be the jQuery script, then the jQuery template script and finally the KnockoutJS script.

First in the root element we need to define the template we are going to use. This is done as follows;


<div data-bind="template:'superHeroTemplate'">

Here you can see in the data-bind attribute i have defined the template as superHeroTemplate. Now this name is the name i have used as the id attribute within the template script i have used below;


<script id="superHeroTemplate" type="text/html">
 <ul>
  {{each superHeroes}} 
   <li>${name}</li>
  {{/each}}
  
 </ul>
</script>

Note that i have specified the type as text/html here since i do not want the browser to interpret this script tag since we are using this for the sole purpose of templating. The superHeroes attribute i have defined within the each tag is the name in my viewModel which is shown below. Also the ${name} attribute is what i am returning from the superHero function that returns obserable objects when passed in the name of the super hero.


 var viewModel = {
    superHeroes:ko.observableArray(data)
   };

This is all that is required for this to work. One thing you might have noticed is that this is a bit too obtrusive in terms of using additional DOM and script tags to make this work. This looks more of a hack since we are specifying script tags with a type calls text/html which is not valid just to make the templating work. This is where the native Knockout templating comes in handy. Let us look at how you can do the same using that and you will see why that is much cleaner.


<!DOCTYPE HTML PUBLIC "-//W3C//DTD HTML 4.01//EN" "http://www.w3.org/TR/html4/strict.dtd">
<html>
<head>
 <title>Superhero Registration</title>
</head>

<body>

 <div>
  <ul>
   <!-- ko foreach:superHeroes -->
    <li data-bind="text: $data.name"></li>
   <!--/ko-->
  </ul>
  
 </div>


<script src="http://code.jquery.com/jquery-1.10.1.min.js"></script>
<script src="jquery-tmpl.js"></script>
<script type="text/javascript" src="http://cdnjs.cloudflare.com/ajax/libs/knockout/2.3.0/knockout-min.js"></script>

 <script type="text/javascript">
 
 $(function(){
   
   var data = [
    new superHero('Superman'),
    new superHero('Spiderman')
   ];
   
   var viewModel = {
    superHeroes:ko.observableArray(data)
   };
   
   function superHero(name){
    return {
     name:ko.observable(name)
    };
   }
   
   ko.applyBindings(viewModel);
  }
  );
 </script>

</body>
</html>

As you can see, no script tags were used. You directly work on the DOM and only need to add HTML comments block and write your code within that. You can even get rid of writing it within comments and directly embed the foreach loop within the DOM element as follows;


<div>
  <ul data-bind="foreach:superHeroes">
   <li data-bind="text:$data.name"></li>
  </ul>
  
 </div>

Much cleaner isnt it? No more hacks, just direct DOM manipulation. That is the power this library gives you. You can write it according to what you prefer.

So that ends my article on how to use templating with KnockoutJS. If you have any queries or feedback, please do leave by a comment which is as always highly appreciated.

Have a nice day everyone!!
Monday, October 28, 2013

Getting knocked out

Everyone is saying JavaScript is the future and i was wondering what all the hype was. Was never a big fan of JavaScript to begin with since i was involved mainly with writing back-end code. But i am always open for new things and being the enthusiast i am, thought to try out one of the plethora of JavaScript libraries out there.

Since MVC knowledge is inherent in anyone who would have written any serious web application, i wanted to try out something closer to my comfort zone. This is where i stumbled upon knockoutjs . It advocates more of a MVVM(Model-View-View-Model) architectural pattern which i believe is a very handy way to handle your front-end logic with a clear layer of separation.

I remember the code we wrote prior to these libraries where we used a separate JSON array for each page to hold all the elements in that page and do all validations based on the attributes we define on each JSON attribute.

With Knockout, this is all handled by the library. It handles the data bindings to the elements, changes to the elements as well dependency tracking. I did some reconnaissance of my own on the library and this article is just an introduction to what you can achieve with this library.

The code is simple, i enter my first name and last name and i have a separate field that displays the full name by concatenating the first name and the last name. Then i have a simple button to generate the JSON string which we could use to send the data back to the server.

Let us look at the code;

 
<!DOCTYPE HTML PUBLIC "-//W3C//DTD HTML 4.01//EN" "http://www.w3.org/TR/html4/strict.dtd">
<html>
<head>
 <title>Personal Information</title>
</head>

<body>

 <div>
  <table>
   <tr>
    <td>First Name : </td>
    <td><input type="text" name="txtName" id="txtName" data-bind="value:firstname,valueUpdate:'afterkeydown'"></td>
   </tr>
   
   <tr>
    <td>Last Name : </td>
    <td><input type="text" name="txtLName" id="txtLName" data-bind="value:lastname,valueUpdate:'afterkeydown'"></td>
   </tr>
   
   <tr>
    <td colspan="2"><span id="lblFullName" data-bind="text:fullname"></span></td>
   </tr>
   
   <tr>
    <td colspan="2"><button data-bind="click: generateJSON">Generate JSON String</button></td>
   </tr>
  </table>
 </div>

<script src="http://code.jquery.com/jquery-1.10.1.min.js"></script>
<script type="text/javascript" src="http://cdnjs.cloudflare.com/ajax/libs/knockout/2.3.0/knockout-min.js"></script>

 <script type="text/javascript">
 
 $(function(){
   var person = {
    firstname:ko.observable(''),
    lastname:ko.observable(''),
    generateJSON:function(){
     alert(ko.toJSON(person));
    }
   };
   
   person.fullname = ko.computed(function(){
    
    return "The full name is : "+this.firstname()+" "+this.lastname();
   },person);
  
   ko.applyBindings(person);
  
  }
  );
 </script>
</body>
</html>

As you can see from the code this is just a normal HTML mark-up. The magic happens within the code between the script tags. For ease of use of this code i have included the knockout and jquery scripts directly from the CDN locations because otherwise you would have to manually download them and include the scripts.

In Knockout, everything revolves around your Model. This is the main point of interaction in terms of Knockout. Here i have defined by model as person. One thing to note is that i have defined the firstname and lastname properties as observable. In Knockout, observables are JavaScript functions since not all browsers support getters/setters.

Then i need to tell how to map each property in my model to the DOM elements. This is done through the data-bind attribute. As you can see, in each input element, i have defined the data-bind attribute and stated that the value property should be equal to the value of the property in my Model.

Knockout also has a concept called computed observables which was previously called Dependent-Observables. What this does is that it allows me to aggregate any fields within the model and show them as part of the result as well and any change in the properties will be reflected in the computed observable variable as well. You can see that if you keep typing values to the firstname and last name input boxes, the full name string also changes accordingly. I have specified another value in the data-bind attribute as valueUpdate:'afterkeydown' which allows the changes typed into the input boxes to be reflected as the user types in which otherwise would only have reflected if the user tabs into the fields.

To bind our Model to the Knockout library, we call ko.applyBindings passing in our Model. There are helper methods that allow us to generate a JSON string of our model which is what i have done in the click event function defined within my Model.

I hope this introduction would get you interested to try this library out if you have not already. I will follow up this post with more advanced topics such as templating, observable arrays, parent binding context etc..

As always your comments and suggestions are most welcome.

Sunday, June 30, 2013

Saying Hello To jQuery Mobile

You find a lot of debate on native mobile applications vs applications running on web views. For me the main priority was to get an application done in the minimum time whilst trying to achieve the smoothness of a native app.

Looking through many content on the web, i ended up with two main options as follows;


This was actually a pretty well thought out framework which was if i am not mistaken, not free initially but made available for free since recent times. Sencha Touch 2 is said to deliver applications that resemble a native application in the Web view space. I was inclined to go ahead with Sencha Touch 2 initially, yet since it was based mostly on JavaScript and since my JavaScript knowledge is a bit rusty and given the time constraints, i had to give up that idea since the learning curve was too steep.

Are we not all fans of jQuery? Well i sure am. Loved the jQuery core API and the time it saved me having to deal with nitty gritty JavaScript details. And then they go and develop a framework for the mobile space. As the syntax was not alien for me as it was when i was looking at some Sencha Touch 2 code, i digged a bit deeper to find out the pros and cons of the framework. I actually ended up using JQM on top of PhoneGap.

All WebView based applications depend on the native browser's support in order to deliver animations to resemble a native application. One drawback in terms of JQM was that my application was experiencing a jittery feel on Android 2.3 (GingerBread). The issue there being that the native browser which comes with GingerBread had less animation support. All animations work fine on higher versions other than 2.3 and lower. This was a drawback i had to succumb to given my time constraints on developing a native application. 

So in this post i will give a glimpse of common problems i ran into whilst using JQM and how to overcome those issues.


  • How do you bind to events on a given page
Coming from some experience on the jQuery core library, i jumped into using the document ready method which was what i was using when building web applications and trying to bind DOM events after the document was loaded. 
Yet this is not how things work on the JQM world. Since all pages are made up of div elements in the JQM space, the pages are loaded using ajax requests which enables the framework to resemble a native app which would not have been possible if the pages refreshed on each page load. Following is a code snippet which shows how one should bind events to a particular page in the world of JQM.


<div id="firstPage" data-role="page">
 <div data-role="content">
   <h1>Content</h1>
   
   <a id="showalert" data-role="button">Click Me</a>
 </div>
</div>


<script type="text/javascript">
$( "#firstPage" ).on( "pageinit", function( event, ui ) {

$('#showalert').click(function(){
 alert('i was clicked');
});

});
</script>

You will see that the page bindings happen using the on() method which is the successor for the predecessor methods such as live(), bind(). Here we have two options, we can either use the pageinit option or the pageshow option. I would not delve into the details of the two since it is self-explanatory.


  • How to programmatically move to another page
By default, page transitions happen through the usage of href links to the page ID of the page you want to go to. But on certain situations, you need the ability to do page transitions based on say a button click. This is how you would achieve this with JQM;


<div id="firstPage" data-role="page">
  <div data-role="header">Hi!! </div>
  <div data-role="content">
  <a id="gotoPage" data-role="button">Go to second page</a>
  </div>
  
  <div data-role="footer">The End</div>
 </div> 
 
<div id="secondPage" data-role="page">
 <div data-role="content">
   <h1>Second page</h1>
   
   
 </div>
</div>


<script type="text/javascript">
$( "#firstPage" ).on( "pageinit", function( event, ui ) {

$('#gotoPage').click(function(){
  $.mobile.changePage( "#secondPage", { transition: "flip"} );
});

});
</script>

Here what we are doing is transitioning from the first page to the second page on a button click. The usage of $.mobile.changePage allows us to accomplish our goal. The second option passed into it is optional where we could define various configuration parameters. I have defined an animation for the page transition when it occurs.


  • Dynamically loading content to a List View
You would often want to populate data to a list view by perhaps reading data from an external system. It would not work by simply creating the HTML content and appending it to the unordered list element. Following is how this can be achieved;


<div id="firstPage" data-role="page">
  <div data-role="header">Hi!! </div>
  <div data-role="content">
  <ul id="myList" data-role="listview" data-filter="true"
    data-filter-reveal="true"
    data-filter-placeholder="Search List..." data-inset="true">

   </ul>
  </div>
  
  <div data-role="footer">The End</div>
 </div> 


<script type="text/javascript">
$( "#firstPage" ).on( "pageinit", function( event, ui ) {

var dataArr = ["one","two","three"];
var content = '';
for(i=0;i<dataArr.length;i++){
content+='<li>'+dataArr[i]+'</li>';
}

 $('#myList').html(content);
 /**
 The following two method calls will refresh the List view with the updated data after page initialization
 **/
 $("#myList").listview("refresh");
 $("#myList").trigger( "updatelayout");

});
</script>

I have used a Javascript array here, but your typical use-case will fetch the data from an external source. The two calls to the listview after appending the html content to the list is where the update of the list takes place. Otherwise you will just get an empty list with no data on it.


  • Revealing list view data only on search
Here my requirement was to reveal the data within the list view only when the user types characters into the search bar. Something similar to a soft search functionality.  How i achieved this is shown from the following code snippet;


<div id="firstPage" data-role="page">
  <div data-role="header">Hi!! </div>
  <div data-role="content">
  <ul id="myList" data-role="listview" data-filter="true"
    data-filter-reveal="true"
    data-filter-placeholder="Search List..." data-inset="true" style="display:none;">

   </ul>
  </div>
  
  <div data-role="footer">The End</div>
 </div> 


<script type="text/javascript">
          $( document ).on( "pageinit", "#firstPage", function() {
   
    $( "#myList" ).on( "listviewbeforefilter", function ( e, data ) {
               
                                $input = $( data.input );
        value = $input.val();
                                if(value.length>0){
                                                loadData();
                                                $('#myList').css("display","block");
                                              
                                }
                                else if(value.length==0){
                                                
                                                $('#myList').css("display","none");
                                }
                               
    });
 

function loadData(){

var dataArr = ["one","two","three"];
var content = '';
for(i=0;i<dataArr.length;i++){
content+='<li>'+dataArr[i]+'</li>';
}

 $('#myList').html(content);
 /**
 The following two method calls will refresh the List view with the updated data after page initialization
 **/
 $("#myList").listview("refresh");
 $("#myList").trigger( "updatelayout");

}
</script>

Using the  listviewbeforefilter i would check if any data is input by the user and only in that instance would i load the data to the list view. Afterwards with a little bit of css i would show or hide the list view based on the input length entered by the user.


  • Passing data from one page to another
Another requirement for me was to pass data from one page to another while transitioning to that page. Since there is no concept of POST or GET in terms of JQM, i had to search how this can be accomplished. The following code snippet shows how this can be achieved;


<div id="firstPage" data-role="page">
  <div data-role="header">Hi!! </div>
  <div data-role="content">
   <a href="#secondPage?name=Tom&phone=9411225597" data-role="button">Check Name</a>
  </div>
  
  <div data-role="footer">The End</div>
 </div> 

<div id="secondPage" data-role="page">
 <div data-role="content">
  <h1 id="txtName"> </h1>
  <h1 id="txtPhone"> </h1>
 </div>
</div>

<script type="text/javascript">
     $( "#secondPage" ).on( "pageshow", function( event, ui ) {
                                 
                                 
      var query = $(this).data("absUrl").split("?")[1];
                                 
        if(typeof query != 'undefined'){
            var params = query.split("&");
                               
            $('#txtName').html(params[0].replace("name=",""));
   $('#txtPhone').html(params[1].replace("phone=",""));
  }
    });
</script>

I am passing the data using the href  tag by appending the parameters as i would do in a typical GET request. The key here is how to capture the data once the data is passed into the second page. We first need to retrieve the URL using the absUrl attribute and thereafter its a simple split and replace of the parameters embedded within the URL. This is the only way i found by which one page can transfer data to another on page transition.


That's about it people. The points where i got stuck are the ones i wanted to highlight here so that anyone else who might face similar issues will benefit from this post if they ever came across it in time :).. I'm sure i will face many more obstacles along the way whereby i will follow this post up with those as well.

Thank you for reading and have a blessed day ahead.

And as usual comments and criticisms are always welcome along with your views on JQM as a framework for the mobile platform. So what do you think?


Monday, April 15, 2013

Let us write a document style Web Service

You might be aware that there are mainly four different styles of web services we can make use of. They are as follows;


  • Document/Literal
  • Document/Literal Wrapped
  • RPC/Encoded
  • RPC/Literal
Of course the RPC/Encoded style is now deprecated. If you are interested you can read up on the different styles of web services and their pros on cons on this very comprehensive article found here.

Today we will see how to write a Document/Literal wrapped kind of a web service. The agenda of this post is as follows;

  • Write a simple web service based on Document/Literal wrapped
  • How to host the simple web service on a tomcat web container
  • A simple test client to test our service
So let us begin our journey;

  • Write a simple web service based on Document/Literal wrapped

package com.wsbindings;

import javax.jws.WebMethod;
import javax.jws.WebParam;
import javax.jws.WebService;
import javax.jws.soap.SOAPBinding;
import javax.jws.soap.SOAPBinding.ParameterStyle;
import javax.jws.soap.SOAPBinding.Style;
import javax.jws.soap.SOAPBinding.Use;

@WebService
@SOAPBinding(style = Style.DOCUMENT, use = Use.LITERAL, parameterStyle = ParameterStyle.WRAPPED)
public interface AddService {

 @WebMethod
 public int addIntegers(@WebParam(name = "intOne") int paramOne,
   @WebParam(name = "intTwo") int paramTwo);
}


So this is our basic web service. This is our base interface for our service. As you can see, we first annotate it with the @javax.jws.WebService to indicate that its a web service we are going to write. Then comes the interesting part where we define our SOAPBinding. Here we state that we want to write a DOCUMENT style web service which is LITERAL and is a WRAPPED style. One thing to note here is that all three attribute values specified within the Soap Binding annotation are the default values so you can get away without declaring them here explicitly. I have done so for the purpose of clarity of this article.

Moving on, let us see how the implementation will look like for this particular interface;


package com.wsbindings;

import javax.jws.WebService;

@WebService(endpointInterface="com.wsbindings.AddService")
public class AddServiceImpl implements AddService{

 public int addIntegers(int paramOne, int paramTwo) {
  return paramOne+paramTwo;
 }

}


Again nothing spectacular here in terms of what this service does. Just adds the two numbers passed in and send back the result of the addition. Note that here again we have to annotate the implementation class with the @WebService annotation.

Now that we have completed the initial part of writing our web service contract and the implementation, let us see how we can host this on a tomcat web container.


  • How to host the simple web service on a tomcat web container
As you know, by default tomcat does not come with a JAX-WS implementation unlike typical application servers such as JBoss, Glassfish. Hence to get it working you need to get an implementation of the JAX-WS specification. In this instance we will be using Metro. You can either copy the jar files from the download to your WEB-INF/lib directory or you can make use of Maven to do that for you, which is what i will be doing in this article. So to get the require jar files related to the Metro implementation i add the following dependency to my pom;


 <dependency>
   <groupId>com.sun.xml.ws</groupId>
   <artifactId>jaxws-rt</artifactId>
   <version>2.1.3</version>
   <exclusions>
    <exclusion>
     <groupId>com.sun.xml.stream</groupId>
     <artifactId>sjsxp</artifactId>

    </exclusion>
   </exclusions>
  </dependency>

Note that i have added one exclusion here for the sjsxp artifact since i needed a newer version than which was being drawn up from transitive dependency. Because else you will get the following exception;

 Could not initialize class javax.xml.stream.XMLStreamException: Underlying stream encoding UTF-8 and input paramter for writeStartDocument() method utf-8 do not match.

In order to overcome this issue i needed to add the following dependency to my pom;


 <dependency>
   <groupId>com.sun.xml.stream</groupId>
   <artifactId>sjsxp</artifactId>
   <version>1.0.1</version>
  </dependency>

I was able to find this solution thanks to this thread.

Moving on, we need to define a specific xml file which should go under the WEB-INF directory called sun-jaxws.xml. This XML specifies how we can access our web services and where the implmentation class is found. Lets look at the content of this file;


<?xml version="1.0" encoding="UTF-8"?>
<endpoints xmlns="http://java.sun.com/xml/ns/jax-ws/ri/runtime" version="2.0">
  <endpoint
     name="AddWS"
     implementation="com.wsbindings.AddServiceImpl"
     url-pattern="/addws"/>
</endpoints> 

Here we give the package in which our web service implementation class resides in as well as the URL pattern on how to access the particular web service. One last thing we should do is to add the following to our web.xml in order to host our web service successfully;


<listener>
  <listener-class>
   com.sun.xml.ws.transport.http.servlet.WSServletContextListener
  </listener-class>
 </listener>
 <servlet>
  <servlet-name>AddWS</servlet-name>
  <servlet-class>
   com.sun.xml.ws.transport.http.servlet.WSServlet
  </servlet-class>
 </servlet>

 <servlet-mapping>
  <servlet-name>AddWS</servlet-name>
  <url-pattern>/addws</url-pattern>
 </servlet-mapping>

Note that we have to define a context listener and a Servlet class which will handle our web service invocations. If you look at the source of the WSServletContextListner you will see it reads the sun-jaxws.xml file from the WEB-INF directory and creates class loaders accordingly for the web service context.

One thing about Document style web services is that you need to generate some code for the request and response. If you do not do this, you will get the following error with the following message;

Have you run APT to generate them?

You can generate the required classes using the wsgen tool which comes bundled up with your JDK installation. You can also use Apache-CXF to generate these classes for you. We will use the latter approach by using the apache-cxf maven plugin which is available for us. Include the following to your pom and your good to go;


 <plugin>
    <groupId>org.apache.cxf</groupId>
    <artifactId>cxf-codegen-plugin</artifactId>
    <version>2.0.9</version>
    <dependencies>
     <dependency>
      <groupId>org.apache.cxf</groupId>
      <artifactId>cxf-rt-frontend-jaxws</artifactId>
      <version>2.0.9</version>
     </dependency>
    </dependencies>
    <executions>
     <execution>
      <id>generate-wsdl</id>
      <phase>process-classes</phase>
      <configuration>
       <className>com.wsbindings.AddServiceImpl</className>
       <argline>-classdir ${project.build.directory}/classes</argline>

      </configuration>

      <goals>
       <goal>java2wsdl</goal>
      </goals>
     </execution>
    </executions>
   </plugin>

Here we are using the java2wsdl command to generate the required request and response objects for our web service. As you can see i have used the <argline> attribute to specify where i want my generated classes to go to. Since the normal maven compile task which is run when building the war file will look in the classes directory, i have specified our classes to be included in the same path as well so that they will be bundled along with our web service class when the war is created. You can see all possible commands you can issue by going through the parameters specified here.

My pom was indicating an error when i included my apache-cxf maven plugin as follows;

Plugin execution not covered by lifecycle configuration

 and after some research on the problem i stumbled upon a solution as stated here.Hence to overcome this issue you have to include the following snippet under the <build> tag of your pom;


<pluginManagement>
   <plugins>
    <!--This plugin's configuration is used to store Eclipse m2e settings 
     only. It has no influence on the Maven build itself. -->
    <plugin>
     <groupId>org.eclipse.m2e</groupId>
     <artifactId>lifecycle-mapping</artifactId>
     <version>1.0.0</version>
     <configuration>
      <lifecycleMappingMetadata>
       <pluginExecutions>
        <pluginExecution>
         <pluginExecutionFilter>
          <groupId>org.apache.cxf</groupId>
          <artifactId>cxf-codegen-plugin</artifactId>
          <version>2.0.9</version>
          <goals>
           <goal>test-compile</goal>
           <goal>compile</goal>
          </goals>
         </pluginExecutionFilter>
         <action>
          <execute />
         </action>
        </pluginExecution>
       </pluginExecutions>
      </lifecycleMappingMetadata>
     </configuration>
    </plugin>
   </plugins>
  </pluginManagement>

That should get rid of that error for you though i cannot give you an exact reason to why that warning pops up. If any of you know the exact reason, i would appreciate if you could leave a comment for the benefit of us all.

After that you can simply generate the war file and copy it to the webapps directory of tomcat. Then you will be able to access the web service on the following path;

http://localhost:8080/ws-bindings/addws

Where 8080 is the port on which i have hosted tomcat on and ws-bindings is the name of my war file.

Lastly let us see how to generate the client stubs required for our service and then write a small client to test our web service.


  • A simple test client to test our service
We will yet again use the apache-cxf maven plugin to generate the client stubs using the wsdl2java command. Note that first we need to get the wsdl from the path where our web service is hosted. It will be located at;

http://localhost:8080/ws-bindings/addws?wsdl

Then i copied the content to a separate xml file and saved it under a resources directory on the separate maven project i created to generate the client stubs. Then all you need to do is add the configuration required to generate the stubs in the pom as follows;


<plugin>
    <groupId>org.apache.cxf</groupId>
    <artifactId>cxf-codegen-plugin</artifactId>
    <version>2.0.9</version>
    <executions>
     <execution>
      <id>generate-sources</id>
      <phase>generate-sources</phase>
      <configuration>
     
       <wsdlOptions>
        <wsdlOption>
         <wsdl>${project.basedir}/src/main/resources/AddService.wsdl</wsdl>
        </wsdlOption>
       </wsdlOptions>
      </configuration>
      <goals>
       <goal>wsdl2java</goal>
      </goals>
     </execution>
    </executions>
   </plugin>

This will generate the required stubs for you to test your web service. Lastly let us write a client to use the generated stub to access our web service;


import java.net.MalformedURLException;
import java.net.URL;

import javax.xml.namespace.QName;
import javax.xml.ws.Service;

import com.wsbindings.AddService;


public class DocWrapperClient {

 public static void main(String[] args) throws MalformedURLException {
   URL wsdlLocation = new URL("http://localhost:8080/ws-bindings/addws?wsdl");  
    
         QName qName = new QName("http://wsbindings.com/", "AddServiceImplService");  

         Service service = null;  
         service = Service.create(wsdlLocation, qName);  
         
         AddService ser = service.getPort(AddService.class);
         System.out.println(ser.addIntegers(1, 1));
 }
}


That is about it guys, and i hope you found the content useful. You can check out the example by downloading the server related maven project from here and the client stub generation maven project from here.

Thank you for reading and hope you have a lovely day ahead of your. Comments and criticisms are welcome as always.

Thursday, April 4, 2013

SuperMan bound by Java Monitors

Photo Taken from : http://goo.gl/2B5Sj


Its a dark time in the life of Super Man. Jor-El wants him to go on a voyage to prepare him for his ultimate destiny. Yet the Earth is faced with dooms-day and the Justice League needs their Man of Steel in action to save the world. But you cant do both at the same time since we have just one SuperMan. Also he cannot fight dooms day without first fulfilling his destiny and realizing his true powers. How do we call upon Superman without making the man go bonkers on what to do. This should be done in an orderly manner where one has to wait until the voyage is done.

We will make use of Java Monitors to help SuperMan listen to his Kryptonian father as well as come back in time to save the world from dooms day. First of all we define the Man of Steel;


/**
 * The awesome kryptonian man is represented by this class
 * 
 * @author Dinuka Arseculeratne
 *
 */
public class SuperMan {

 private boolean onVoyage = false;

 /**
  * Schedule a voyage for Superman. Note that this method first checks whether he is
  * already on a voyage, and if so calls the wait() method to hault the current thread
  * until notify is called and onVoyage is set to false.
  */
 public synchronized void goOnVoyage() {

  if (onVoyage) {
   try {
    System.out.println("SuperMan is already on a voyage. Please wait until he returns from his quest.");
    wait();
    System.out.println("His goyage is over, time for him to go on a new voyage....");
   } catch (InterruptedException e) {
    System.out.println(" I am SuperMan, i do not handle these petty exceptions");
   }

  }
  onVoyage = true;
  notify();

 }

 /**
  * This method calls Superman back from his current voyage. Again the method
  * checks whether Super man is not already on a voyage. If so the current thread is
  * Halted until he is schedule to go on a voyage because he needs to be on a voyage
  * to be called back in the first place.
  */
 public synchronized void returnFromVoyage() {

  if (!onVoyage) {
   try {
    System.out.println("SuperMan is not yet on a voyage. Please Wait.");
    wait();
    System.out.println("Great he has gone on a voyage, time to call him back!!");
   } catch (InterruptedException e) {
    System.out.println(" I am SuperMan, i do not handle these petty exceptions");
   }
  }
  onVoyage = false;
  notify();
 }
}


So we have defined SuperMan. Note that he has two methods defined. One which allows him to go on a voyage and another to call him back from his current voyage. As you can see SuperMan does not handle exceptions because, well.......... He is SuperMan and he is the exception :). You can see that before each call we check the boolean indicating whether he is on a voyage or not and depending on the method called, the wait() of the Object is called in order to halt the current thread that is calling the method until notify() is called by the thread that is currently operating on the object. Note that wait() and notify() should be called inside a synchronized method or block for it to work accurately. Because you first need to acquire a lock in order to halt or notify it.

Getting back to the previous issue, we know that both the Justice League and Jor-El need SuperMan but for different purposes. Lets see how this battle unravels with the following code snippet;


public class Test {

 public static void main(String[] args) {
  SuperMan superMan = new SuperMan();
  
  JusticeLeague justiceLeague = new JusticeLeague(superMan);
  justiceLeague.start();
  
  JorEl jorEl = new JorEl(superMan);
  jorEl.start();
  
 }


}

class JusticeLeague extends Thread{
 
 private SuperMan superMan = null;
 
 public JusticeLeague(SuperMan superMan)
 {
  this.superMan = superMan;
 }
 
 @Override
 public void run() {
  superMan.returnFromVoyage();
 }
}

class JorEl extends Thread{
 
 private SuperMan superMan = null;
 public JorEl(SuperMan superMan)
 {
  this.superMan = superMan;
 }
 
 @Override
 public void run() {
  superMan.goOnVoyage();
 }
 
}


Note that here we have JorEl and the JusticeLeagure operating on two different threads trying to access SuperMan concurrently. As you can see from our main method, the JusticeLeague wants to call back SuperMan in order to save the world. But fortunately he is not yet on a voyage so its illegal to ask him to return. Then comes JorEl asking his son to go on a voyage to fulfill his true destiny. It is only after this voyage that he can return to save planet Earth. If you run this now you can see that the JusticeLeague thread is halted until SuperMan goes on the voyage and notify is called. Just for fun try to comment out the notify() method and you will see the application will hang because now one thread will wait indefinitely until it is notified of the completion of the process.

If not for Java Monitors, SuperMan would have failed since he would have gone to face doomsday without first going on his voyage and fulfilling his destiny. And Java saves the world again.

Note : The story is fictional yet Java Monitors are real


Thank you for reading everyone. And have a great day ahead. If you feel like it, please do leave by a comment. Cheers!!

Wednesday, March 27, 2013

jqGrid Learnings

I have been using jqGrid for a few projects that was done using PHP. For anyone who does not know what jqGrid is, its a fully featured library that allows you to display and manipulate your data in tabular form. Saves you tons of time writing pure tables to handle and manipulate your data. It has two variants where one is the commercialized version (jqSuite) and the free version is maintained here. The API is very much verbose with a plethora of methods for almost anything you would ever want to do in a grid. This post will be aimed at use cases to which i used jqGrid and what changes i needed to do in order to get it working.


  • Custom search on a button click
By default jqGrid sends a data search GET request on page load. It also has a refresh button in the bottom part. What i wanted was to send a GET request with the search parameters on a button click. To achieve this i first built the URL with the parameters as follows;


var length = jsPatientSearchCtrl.length;
var searchURL= "server.php?";
for(var i=0;i<length;i++){

 if($('#'+jsPatientSearchCtrl[i].id).val()!=''){

   searchURL+="&";
  
   searchURL+=jsPatientSearchCtrl[i].desc+"="+$('#'+jsPatientSearchCtrl[i].id).val();
   
 }
}
Here i am iterating through the JSON array i have defined to hold the data objects within my given page. After creating the URL with the parameters you have to tell jqGrid to reload the data as follows;

jQuery("#list2").jqGrid('setGridParam',{url:searchURL}).trigger("reloadGrid")

This will send another GET request to the server to reload the Grid with new data according to our changed search criteria when the user clicks on the search button.


  • Editing grid data using a form submission
By default jQGrid provides the ability to edit the fields within our Grid by opening a dialog where by you can change the details for a given record and submit it. To do this, first you have to enable the edit option in your grid. You do this as follows;


jQuery("#list2").jqGrid('navGrid',
'#pager2',
{edit:true,add:false,del:true,search:false}
); 
Here i have enabled the edit option by setting the value to true and have disabled the add and search functionality as this was not required in my scenario. After that you need to define which columns you want to edit. You do this within your colModel parameter which you give when constructing your jqGrid. I present what i have used;


colModel:[ 
  {name:'Ref',index:'id', width:55,sortable:false,editable:false,editoptions:{readonly:true,size:10}},
  {name:'Identity',index:'patient_identity', width:90,sortable:false,editable:true,editoptions:{size:10}}, 
  {name:'Reference',index:'patient_identity', width:90,sortable:false,editable:true,editoptions:{size:10}}, 
  {name:'Date',index:'date', width:90,sortable:false,editable:true, editoptions:{size:10}}, 
  {name:'Time',index:'time', width:50,sortable:false,editable:true, editoptions:{rows:"1",cols:"10"}}, 
  {name:'Name',index:'patient_name', width:130,sortable:false,editable:true,edittype:"textarea", editoptions:{rows:"1",cols:"20"}}, 
  {name:'Referred',index:'referred_by', width:100,sortable:false,editable:true,edittype:"textarea", editoptions:{rows:"1",cols:"20"}}, 
  {name:'Blood',index:'blood_collected_at', width:120, align:"right",sortable:false,editable:true,edittype:"textarea", editoptions:{rows:"1",cols:"20"}}]
Important things to note here is that certain fields we have set editable:false which signifies that these values will not be able to be changed by the user when editing. To enable editing on a particular column we define it as editable:true. Optionally you can define a size. You do this using the editoptions attribute. For example as per the above code snippet, we have used editoptions:{size:10}  to give a size of 10 to that particular text field.

If you want to define a text area, this can also be achieved. Again revisiting the above code, we have done this using editiontype:"textarea",editoptions:{rows:"1",cols"20"}. There are many other types you can define such as check boxes etc. More info on the supported types in the edit option can be found here.


  • Close the Add/Edit dialogs upon submit
By default the Add/Edit dialogs do not close after submitting the values. You have to press the close button yourself. It was required for me to close the dialog on submit. This was achieved as follows;


jQuery("#list2").jqGrid('navGrid',
'#pager2',
{edit:true,add:true,del:true,search:false}
,{width:500,closeAfterEdit: true},{width:500,closeAfterAdd:true}); 

As you can see within the code snippet, i have set the attribute closeAfterAdd  and closeAfterEdit  as true. This will close the Add/Edit dialog when the user clicks on the submit button.

Another thing to note here is that when you enable editing and adding, you need to specify to which URL the POST parameters on submit should be sent to. You do this as follows;


jQuery("#list2").jqGrid({
editurl: "editperson.php"
  });

Note that the data for add, edit and delete are sent to the same URL, so you need to identify the operation uniquely. jqGrid by default sets a parameter for us to distinguish this when sending the POST request to the URL we prodive in the editurl attribute. With PHP this is how we handle it;


 if(isset($_POST["oper"])){
 $operation = $_POST["oper"];
 
 switch($operation){
 case "del":
 break;
 
 case "add":
 break;
 
 case "edit":
 break;
 }
}

As you can see jqGrid by default sets a parameter named oper which defines which operation the data that is sent belongs to. So we can handle our logic according to whether its an add/edit or delete.

That is about it on use cases i have come across when using jqGrid. Some of the problems i faced were solved after some Google searching and putting together information gathered from various sources. Hence the purpose of this post was to put it altogether and provide a one-stop point for most of the common scenarios you might use jqGrid for.

Thank you for reading. Have a great day ahead.

Monday, March 25, 2013

Drupal to the rescue

My sister wanted to jump start her business in migration services related to Sri Lanka and wanted a website done. Contemplating on how to approach this within the time frame requested i was thinking along a few dimensions.


  1. The site should be built in 1-2 days time
  2. Must be cost effective to host and manage
  3. Ability for my sister to manage the content as time goes by
  4. Deliver with minimal effort
First i thought i would mash up a site coding it myself. As the cost effective (the elegant way of say cheap) way of hosing as i know is with PHP i wanted to initially do the coding myself. As i am primarily from a Java background and given my PHP skills were a bit rusty since the only time i really code in PHP is when i do freelancing related projects, i was thinking whether i could finish it on the given timeline.

This is when i thought in the line of CMSs (Content Management Systems). There are many options to chose from such as Drupal, Wordpress, Joomla. Wordpress byitself is not a fully fledged CMS per se, but it gives you the ability to administer and manage your content.I went ahead with Drupal mainly because i found an ebook that explained it in detail and i was able to figure it out within a couple of hours time. Im not saying the other two options are less competent, but in the end i believe you have to approach the solution with something you are comfortable with given the time frame and since this is not like a mission critical system i am aiming to develop there were no explicity trade-offs.

Drupal with its modular architecture made me feel at home since its concept is easily comprehensible. Also its intuitive administrative console allowed me to teach my sister how to manage the site in the future without my help since she would want to change the content as time goes on.

The main important elements with regards to Drupal was;

  • Regions
          Region is all about page layout in its simplest terms. If you are to hand code with html and css, you will probably use div elements to divide your page for instance to hold the header part, footer section, and main content section. With Drupal you have a multitude of themes to chose from. I would say first design your website deciding on how you want your elements to be aligned. I use Adobe Fireworks for my initial design purposes. Then depending on your page layout you need to select the Drupal theme that best fits your layout since all themes have a specific layout to place content.

  • Blocks
         A block is a particular element in which you group a set of content that you want to display. It can be a navigation menu, or you can even build your own custom block which would consist of a certain section you want to present. Also blocks give you the ability to be able to be displayed only in certain pages which i believe is such a great feature to give the flexibility to the user.

  • Content Types
         There are mainly two content types when you first start out. Stories and Pages. A Story typical is published on the home page and allows the users to comment. It is recommended to use this for news feed and content that is updated regularly. Pages are static content which is mostly what is required when building web pages. You can even stick it on the front page if required so it can act like a story in someway. The beauty of Drupal is that you can even define your own content types to match your requirements. With Views and CCK (Content Construction Kit), you can customize Drupal according to your needs.

This is the site i built for my sister in the end. Its not flashy or anything, but hey this is the best i could achieve with around 6 hours of work to get it up and running. I used the basic bartik theme that comes by default since i did not see the need to adapt any other. You can also change the look and field by injecting your own customer CSS file. That is another topic by itself.

CMSs save alot of time you would spend aligning your content and adapting and incorporating possible changes in the future. It allows you to manage your content, security and users with ease. Also it prevents your site from known attacks such as cross side scripting, sql injections etc which otherwise you would be handling by yourself or through a framework you would be using. Though it is not as exciting as hand coding yourself, for me, it was the right tool for the job in this given situation. After all you should work smart and not hard right ;)

Cheers all and thank you for reading. As always comments and criticisms are always welcome.


Saturday, February 23, 2013

DZone, your too sweet!!

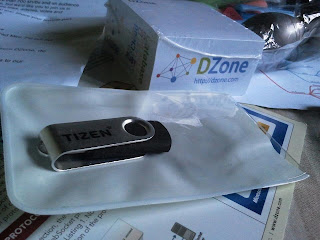
And the wait is finally over, because today i just received my DZone Goody pack. Got a mail from the local postal office saying it was held at the respective post office and wanted me to come and collect it. I actually had no idea that it was the goody pack that arrived. My eyes simply lit up once i saw the box. WOW... could not wait until i got home to open it up.

And this is what i found;


Loved each item in the pack specially the t-shirt and the USB drive. Ofcourse the missles were pretty darn awesome too ;)..

Thank you so much DZone and this definitely is a push the right direction for me to continue contribution even more to your esteemed community.

Cheers


Saturday, January 12, 2013

Dev vs QA, should there really be a distinction?

We had our scrum of scrum meetings last Wednesday where all scrum masters meet up with our line manager to discuss issues, bottlenecks and success stories of our previous sprint. One issue highlighted was the fact that sometimes the QA(Quality assurance) personnel are clogged up with testing issues that are in the "Ready for test" stage. So one idea that came about was that given the fact that some developer resources are freed up during this period, that it would be better off putting up some of their time to test the issues.

My first reaction was "HELL NO!!". My primary concern was that a developer will never have the mindset of a QA personnel when it comes to testing since he/she would always have a stringent approach on how to view the application. Also there is a notion among a few that doing QA is so "feminine" (again this is what i have observed and would differ from the context where i am in). So i took a step back, took a deep breath, turned off my dev-mode and looked at the suggestion in a more holistic manner.

I'm a person who loves to acquire new knowledge, be it from reading books, journals or simple through other's experience (young or old). So for me this turned out to be a way i could grab some new knowledge. Specially about software testing and quality. Now i know writing unit tests count for something, yet that is at its name dictates a unit level testing. When it comes to quality assurance, that is a whole new beast in its own right. Now you have to think in the perspective of how users interact with the system and not in the way you wrote the code for the application to behave.

By learning the art of QA testing, i believe that it would enable me to write more quality code since i would have the user's mindset and approach when testing my own code before i push it in to version control. Also in scrum the notion is that we as a team commit to deliver a set of issues we plan for a particular sprint. Hence if i do development or testing doesn't really matter since either way i am contributing towards helping my team achieve our team's commitment. It should not be thought of as someone else's responsibility. It's the team's responsibility to deliver the planned work on time with quality.

But such a change of mindset does not happen overnight. Its not merely about you going and telling each developer that he/she has got to start testing issues from the next sprint. I believe of leading by example. It's a win-win situation since i gain an extra skill of quality assurance testing whilst the team will emancipate themselves from the notion of thinking testing is not a part of responsibility of a developer (Hopefully). Change needs time to sink-in, and you cant coerce anyone into embracing change, but you can influence them through your actions.

What if some people never gets on board with this idea? Well i would say its their loss and my gain since in this dynamic business context we live in, i strongly believe if you try to stay with the pack, you will always be where you are right now.

Break away from restrictive thinking, like Lion-O of thunder-cats tells his awesome sword to give him sight beyond sight, we should strive to look through the limitations and think in ways we usually would not and get our lazy bottoms out of the conservative thinking mode.

That my friends brings me to the end of my note for the day. I hope you enjoyed reading it. Please do leave by your comments, views, criticisms and thank you for taking the time to read through.